Lawrence Silk Art Framing Method
After taking several workshops to get her feet wet, finally Diane produced a piece ,that she felt warranted framing. She approached three different frame shops in her area inquiring how the silk should be framed. Dry mounting was the answer every time. Dry mounting requires that the fabric be glued to some medium, usually foam core or mat board. Then a combination of pressure and heat adheres the fabric into place. It is considered permanent. But, she didn’t want to lose the quality or sheen of the silk by gluing it down.
This method of framing floats the silk on top of the mat board. There is no contact between the glazing and the silk. Flannel is used under the silk to cushion the edges when it’s stretched so there is no damage to the permanent work. To quote one of Diane's professors, “Never frame your art in a manner that will damage the art or that cannot be changed without damaging the art.”
The archival Lawrence method of framing floats the silk on top of the mat board. There is no contact between the glazing and the silk. Flannel is used under the silk to cushion the edges when it's stretched so there is no damage to the silk over a period of time when the silk flexes.
How to Frame your Art using the Lawrence Method
- Acid free linen tape 1” wide, moisture activated, cut in 2” pieces
- Acid free foam core, 1/8” thickness
- 100% white cotton flannel, washed and ironed (all new materials contain formaldehyde, washing will remove this chemical)
- White glue, such as Elmer’s
- Regular foam board, 1/8” thickness
- Floater frame profile 50, Designer molding
- Pressing cloths or some type of cloth to protect when ironing
- Plexiglass for glazing
- Acid free mat board
Directions
- Cover a work surface with a sheet or cloth to prevent slippage of silk. It would be ideal if you could also iron on this surface if needed.
- Measure the actual image that you want showing in your frame. After this add at least 1/2 to 1 inch on to that measurement. The reason you will need this extra fabric is for wrapping the silk around the edge of the foam board.
- Cut a piece of acid free foam board the image size in another area besides on the cloth. Doing this will avoid contaminates getting on your cloth such as bits of foam board, dust, etc.
- Place silk that has been steamed and finished with the image side down on the covered work surface.
- Cut the flannel slightly smaller than your silk by 1/4 to 1/2 inch. If necessary iron the flannel. Place flannel on top of silk.
- Place cut piece of acid free foam board on top of silk and center it so the edges will be in alignment with your image. I do this by carefully lifting up the flannel to see where the foam board lines up with the image.
- Starting with the longest side of the image apply moistened pieces of linen tape to the silk that has been gently brought up over the edge of the foam board. Make sure you apply pressure so it will adhere properly.
- Allow this side to dry completely before going to the opposite side. Then gently stretch the silk and also fasten with linen tape. Don’t stretch too tight or the foam board will warp or you may cause damage to the silk.
- To finish the remaining ends you will have to first cut the fabric at the corners in opposing diago- nals. See diagram below.
Mounting Silk Painting to Mat Board
- Decide on the borders you want around your image and cut your mat board that size.
- Cut regular foam board that same size.
- Glue mat board to regular foam board with white glue. Make sure you’ve used enough glue so that the mat board is completely attached to the foam board. Weight down, if necessary, and let dry.
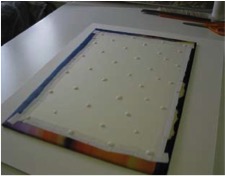
- On the back side of your stretched silk painting, apply dots of white glue on the acid free foam board. Do not apply glue to any of the silk.
- Carefully center silk painting on the mat board, place a clean piece of foam board on top and weight down with books overnight.
- Assemble three sides of your frame.
- Slide mounted artwork into frame, along the largest side. Check for lint, etc., and remove debris.
- Clean plexiglass and gently slide in last piece of the frame. Assemble last piece of frame and attach wire.
Please note if using wooden frame custom spacers will need to be made to separate the silk and glazing (glass). The size of these spacers will depend on the depth of your frame. |
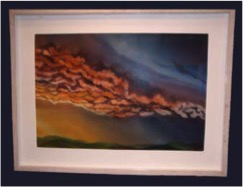
Photo of a finished piece mounted using this method

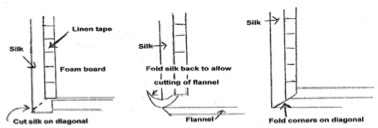
Diagram of how to wrap
|